Do I need to make pattern adjustments?
If you’ve ever found that conventional patterns just don’t fit quite right, you’re not alone! For example, if your bust is significantly larger compared to the rest of your body, choosing a bigger size to fit your bust can leave the rest of the garment feeling oversized.
You might also find that while your measurements match the pattern, you’re either much taller or shorter than the height it was designed for, which can throw off the fit.
Adjustments are a great way to tailor a garment to your liking. Take our Audrey Shift Dress, for instance. It’s a loose-fitting style with plenty of ease, but if you’re craving a more fitted look, it’s totally doable!
We’ll use the Audrey Shift Dress as our main example, but you can apply these same principles to any similar pattern you have at home.
Here’s what we’ll cover:
- Adjusting the length of the pattern (both bodice and skirt)
- Combining sizes
- Making a Small Bust Adjustment
- Making a Full Bust Adjustment
And remember, always create a muslin or toile with some inexpensive fabric first. This way, you can test your adjustments without wasting your good materials!
Always make a muslin/toile of the pattern with inexpensive fabric so you can make sure about the amounts you need to use in your adjustments.
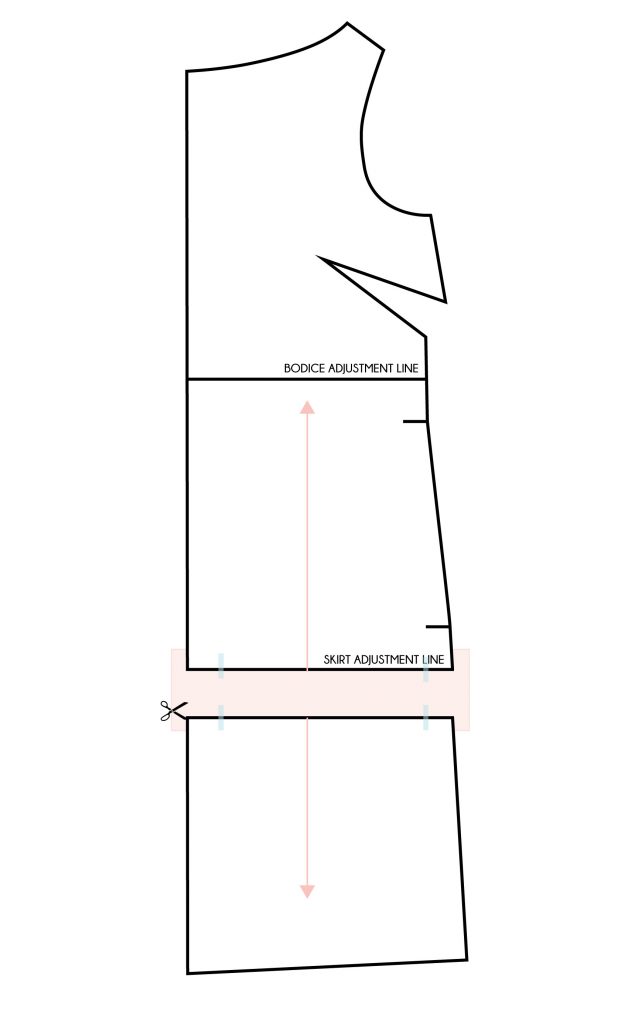
Adjusting The Length
Pattern Sewciety’s patterns come with handy Adjustment Lines that show you exactly where to make your tweaks. Usually, you’ll either want to lengthen or shorten the bodice or hem of your garment. To help with this, we’ve placed adjustment lines right above the waist and below the dart for bodice length adjustments, and below the hip for hem length changes.

ADDING LENGTH
Step 1: Start by ensuring there’s a vertical grainline running over your adjustment line.
Step 2: Cut along your chosen adjustment line so you have two separate pattern pieces.
Step 3: Next, slide a piece of paper underneath those two pieces and move them apart to your desired length, making sure to keep that grainline aligned.
Step 4: Finally, tape your pattern pieces in place and connect the side seams to make sure everything is nice and even.
S
SUBTRACTING LENGTH
Step 1: Start by drawing a line above the adjustment line to indicate how much length you want to subtract.

Step 2: Next, ensure there’s a vertical grainline running over your adjustment line.
Step 3: Fold your adjustment line up to meet your new line, keeping that grainline aligned. I like to use a tracing wheel to perforate the line; it makes the folding process a bit easier.
Step 4: Once you’ve got it folded, tape everything in place and make sure to true up your side seam.

Combining Sizes
You can combine sizes if your measurements fall within the Body Measurement chart but land in different sizes.
![]()

As you can see from the size chart above, my measurements are all over the place, which is the perfect reason to combine sizes! Just a quick note: you don’t have to combine sizes if you don’t fit a specific size exactly. Always consider the ease of the garment when making your decision. The Audrey Shift Dress has plenty of ease, so I’m fine sticking with a Medium to match my bust measurement. This choice really comes down to personal preference, and it’s a fantastic dress to experiment with!
Now, back to combining sizes.
In the image below, you can see that you simply connect the bust, waist, and hip points of the different sizes. Just remember to smooth out any sharp angles or curves for a nice, clean line.
![]()

If you find that you’re caught between the sizes listed in the size chart, you can also find your “custom” spot on the pattern to draw your side seam. Let’s use these measurements as our example:
- Bust: 35″
- Waist: 29″
- Hip: 39″
Step 1: Start by comparing the Finished Garment Size Chart with the Body Measurement Chart to see how much ease is included. If your pattern doesn’t have a Finished Garment Chart, you can decide how much ease you want to add yourself. Since my bust measurement matches the chart, I’ll only be adjusting the waist and hip.
For example, if the pattern’s waist is 37.5″, that gives us 10″ of ease when we subtract my waist measurement of 27.5″.
Step 2: Now that I’ve established the ease, I can add it to my personal measurement.
So, my waist is 29″ + 10″ ease = 39″.
Step 3: I’ll divide this amount by 4, since this pattern piece represents just a quarter of the garment.
39″ / 4 = 9.75″.
Step 4: Since this pattern includes a 0.5″ seam allowance, I need to add that to get my total measurement.
9.75″ + 0.5″ seam allowance = 10.25″.
Step 5: Now, take your measurement—in this case, 10.25″—and measure it over from your center front (CF) or center back (CB). I’ll use the marked waist of the size Small as my guide since that matches my bust measurement. Just mark it there!


Step 6: After applying this method to your hip as well, you will blend the side seams.
Bust Adjustment
Let’s dive into how to make both Small and Full Bust Adjustments.
Most pattern companies base their sizes on a B cup, which is the most common cup size, so it’s not unusual for you to need to make adjustments to the bust.
You’ll want to make a Small Bust Adjustment if you need to make the bust dart smaller for a snugger fit. As the name suggests, this adjustment is typically small. A good rule of thumb is that there’s about a 1″ difference between cup sizes. So, if you’re adjusting your pattern from a B cup to an A cup, you’d need to make a 1″ adjustment, shifting your pattern pieces over by 0.5″.
On the other hand, a Full Bust Adjustment is necessary when your bust measurement is proportionally larger than the rest of your measurements.
To make a Full Bust Adjustment, you’ll want to measure your bust in two ways to find your size. First, measure your High Bust, which is just under your armpits, right above your bust. Then, measure your Full Bust, which is around the fullest part of your bust. The difference between these two measurements will help you determine your cup size, though it might not always match your bra cup size. Here’s a quick guide:
- 2″ Difference: B cup
- 3″ Difference: C cup
- 4″ Difference: D cup
- 5″ Difference: DD cup, etc.
Next, to determine how much to shift your pattern pieces, you can use these measurements:
- 0.5″ for a C cup
- 0.75″ for a D cup
- 1″ for a DD cup
- 1.25″ for an E cup
- Etc.
I like to cut my pattern at the waist when making adjustments to the bust. You’ll follow the same initial steps for both types of adjustments.
Step 1: Start by identifying the bust apex on the pattern piece. The bust apex is the most prominent part of the breast. For the Audrey Shift Dress, you can find the bust apex by drawing a line through the center of the dart and extending it by 1″ (as shown in the image below). Alternatively, you can hold the pattern up against you and mark your apex directly.
Step 2: Now, draw the following lines on your pattern:
- A line through the center of the dart to the apex
- A line from the apex down to the bottom edge
- A line from the apex to the armhole (about 1/3 of the way up)
- A horizontal line near the bottom connecting the vertical line to the center front (CF). In this pattern, we’ll use the Bodice Adjustment Line.
![]()
Step 3: Cut along the lines as indicated in image below. Make sure to leave hinges at armhole and dart point.

Small Bust Adjustment:
Step 4: Draw a line parallel to your vertical line, which is now cut open (check out the pic above), and space it out by the amount you want to adjust the bust. In this example, we’re adding 0.5″, which gives us a total adjustment of 1″.
Step 5: Shift your pattern pieces over to align with your new line, using it as a guide to keep everything parallel. You’ll notice that your dart partially closes and becomes narrower. Once you’ve got it lined up, tape everything in place!

![]()
![]()
Full Bust Adjustment:
Step 4: Place a piece of paper underneath the pattern pieces and tape everything down. Then, shift the pattern pieces apart at the vertical line by the amount you want. Just make sure to keep those vertical lines parallel. You’ll see your dart widen as you do this.
Step 5: Next, draw a horizontal line from your original apex to the side seam. Measure over 1″ to find your new apex and mark it. After that, measure the new dart opening created by shifting the pattern pieces apart. Use that measurement to figure out where the new bottom dart leg should go.

Both Adjustments:
Step 6: Take the small square piece you have left and move it to line up with the bottom of your pattern.
Step 7: Now, draw in the new side seam and smooth it out for a clean finish.
We hope you found this tutorial helpful and that you enjoy your perfectly fitting garments! 🙂